
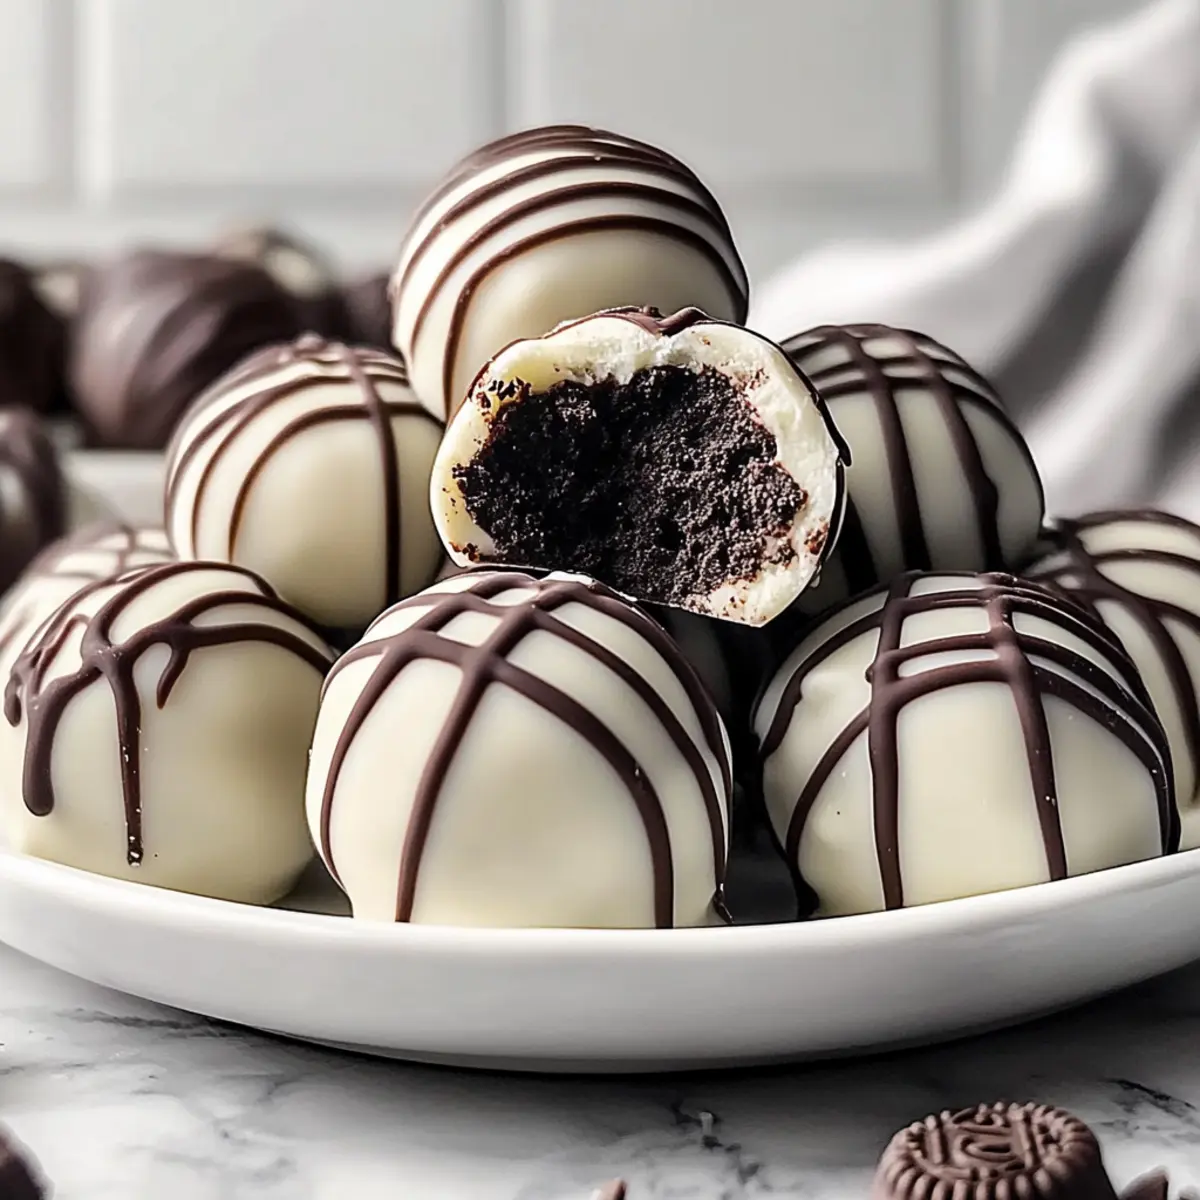
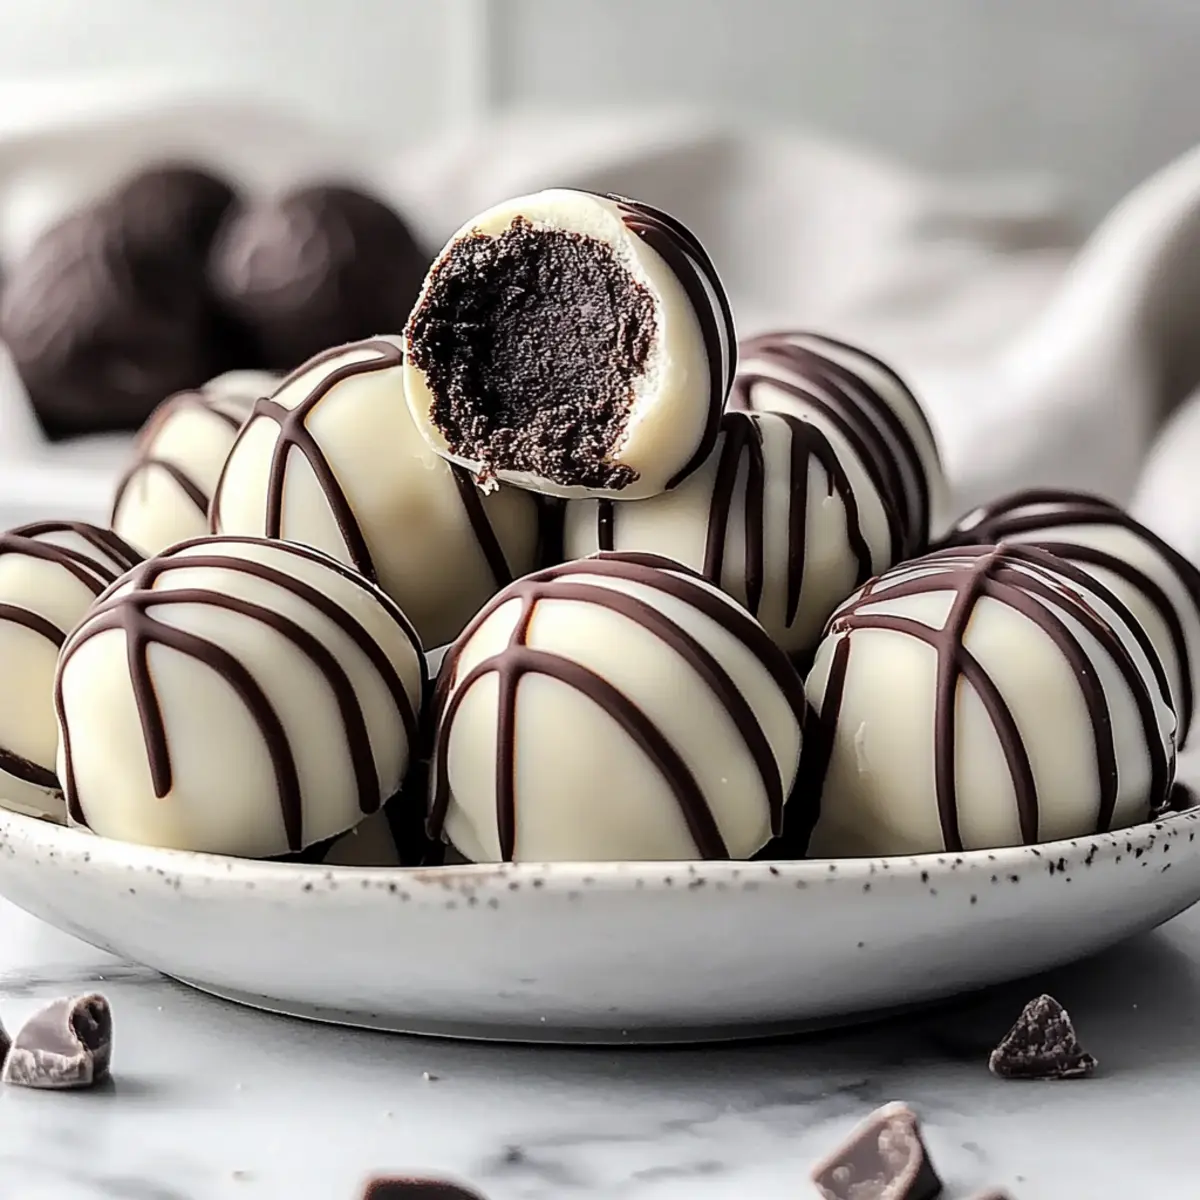
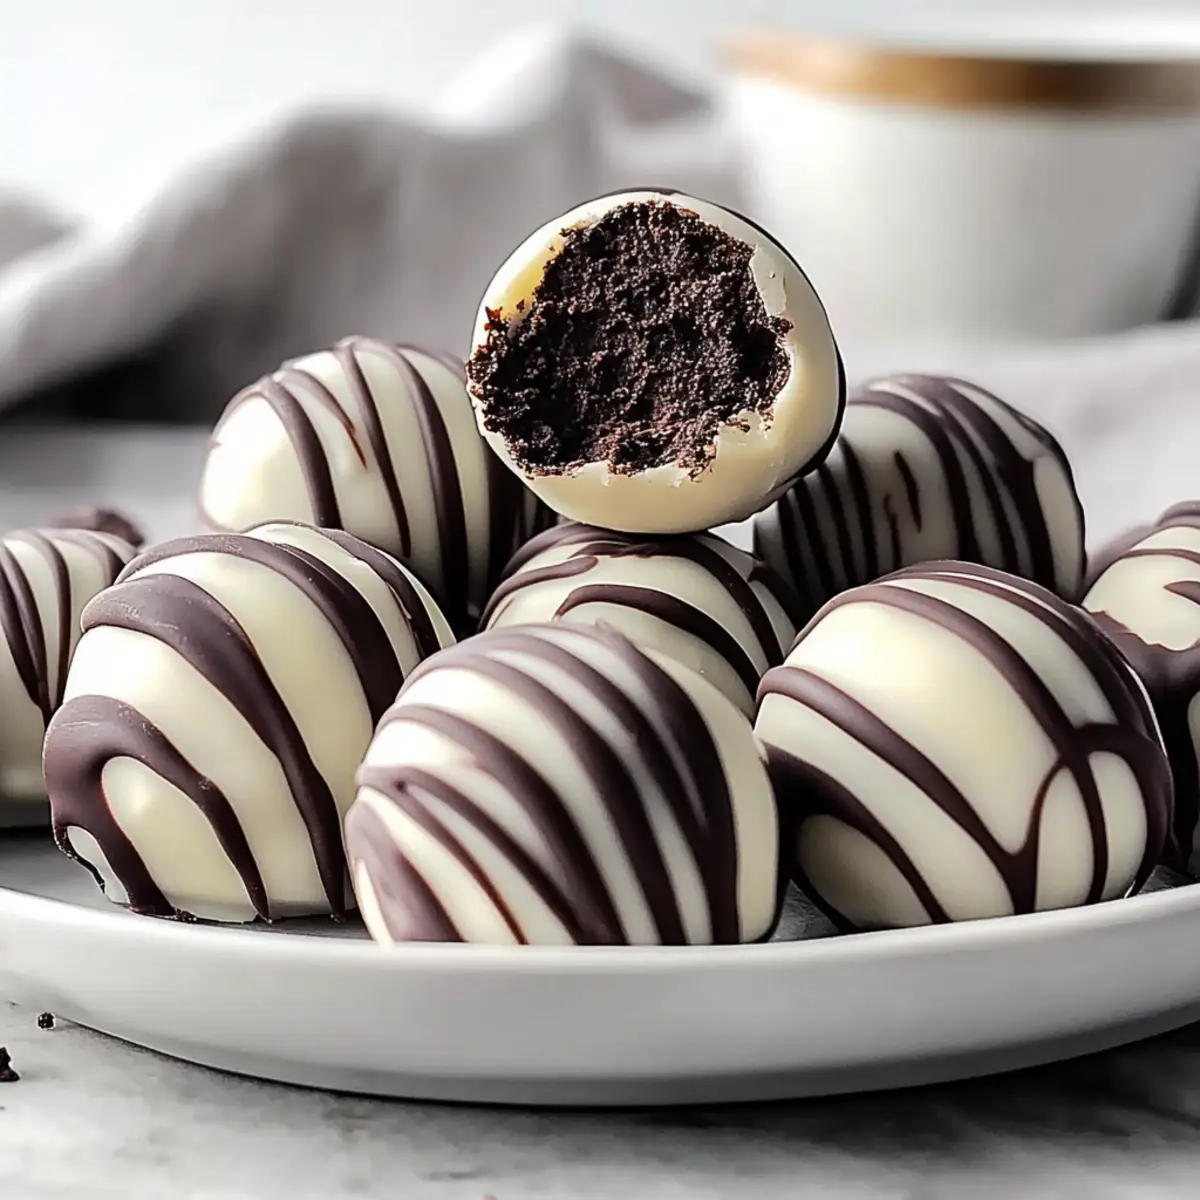
As I rummaged through my pantry one afternoon, I stumbled upon a forgotten package of Oreos, and a sweet idea began to form. Enter the Oreo Balls Recipe—a delightfully simple no-bake treat that marries the classic cookie with creamy cream cheese for an indulgent, bite-sized dessert. These luscious truffles, requiring just three ingredients, are perfect for those busy days when you crave something sweet without the hassle of baking. Not only do they come together in a flash, but they also make an impressive treat for gatherings, impressing friends and family alike. Who knew that such a rich, delicious dessert could be so effortlessly crafted? Ready to create your own batch of these dreamy Oreo Balls? Let’s dive into the delightful world of chocolate indulgence together!
Why Are Oreo Balls So Irresistible?
Simplicity at Its Best: With just three ingredients, you can create a delicious treat without any baking involved—perfect for busy days or last-minute cravings.
Flavor Explosion: The lovely blend of Oreos and creamy cream cheese delivers a rich taste that everyone loves.
Endless Versatility: Feel free to experiment with different cookie flavors or toppings, making your Oreo Balls unique every time!
Crowd-Pleasing Treat: Whether it’s a family gathering or a friendly potluck, these truffles are sure to impress and satisfy! If you’re looking for more no-bake ideas, check out my Moist Banana Bread for a delicious twist!
Storage-Friendly: Not only do they last well in the fridge, but you can also freeze them for future indulgences—perfect for getting ahead on your dessert game!
Oreo Balls Recipe Ingredients
For the Oreo Mixture
• Oreos – The star of the show, providing the perfect flavor and crunch; avoid Double Stuf for optimal texture.
• Cream Cheese – Serves as the smooth binding agent, delivering a rich and creamy center; opt for full-fat for the best results.
For the Chocolate Coating
• Dark Chocolate Melting Wafers – Adds a luxurious, glossy finish; can be substituted with milk or semi-sweet chocolate mixed with coconut oil for melting.
• White Chocolate Melting Wafers – Offers a sweet contrast to the dark chocolate and enhances the visual appeal of your Oreo Balls.
Experiment with other variations or decorative toppings to make your Oreo Balls Recipe truly your own!
Step‑by‑Step Instructions for Easy No-Bake Oreo Balls Recipe
Step 1: Crush the Oreos
Begin by placing 36 Oreos into a food processor. Pulse until you achieve a finely textured crumb, bringing the chocolate-rich flavor and crunch to life. This step should take about 30 seconds; the crumbs should resemble sand rather than chunks for the best consistency in your Oreo Balls.
Step 2: Mix in Cream Cheese
Add 8 oz of softened cream cheese directly to the Oreo crumbs in the food processor. Pulse the mixture until it is thoroughly combined, creating a cohesive dough that is creamy and easy to work with. This should take around 1 minute; you want to see no visible streaks of cream cheese.
Step 3: Form the Balls
Transfer the mixture to a large bowl. With clean hands or a cookie scoop, portion the mixture and roll it into balls about 1 inch in diameter, ensuring they are uniform in size. Place each ball on a lined baking sheet and aim for neatness; this will help the finished Oreo Balls look appealing and professional.
Step 4: Chill the Oreo Balls
Once formed, place the baking sheet with the Oreo balls in the refrigerator. Allow them to chill for at least 1 hour; this helps the balls firm up, making them easier to coat in chocolate later. Check for a slight firmness when pressed lightly with your finger.
Step 5: Melt Dark Chocolate
While the Oreo balls are chilling, prepare your chocolate coating. In a microwave-safe bowl, melt dark chocolate melting wafers in 30-second intervals, stirring in between until smooth and fully melted. Aim for a glossy texture without any lumps, as this will give your Oreo Balls a beautiful finish.
Step 6: Dip Truffles in Chocolate
Carefully dip half of the chilled Oreo balls into the melted dark chocolate, ensuring they are fully covered. Lift them out using a fork, allowing excess chocolate to drip off. Place the coated Oreo Balls back on the lined baking sheet and repeat this process with all of them for a wonderful chocolatey indulgence.
Step 7: Melt White Chocolate
Now, melt the white chocolate wafers following the same method as the dark chocolate: microwave them in short bursts, stirring until smooth. This warm, sweet chocolate will contrast beautifully with the dark chocolate coating of the Oreo Balls, adding an appealing touch.
Step 8: Dip Remaining Truffles
Once the dark chocolate has set slightly, dip the remaining Oreo balls into the melted white chocolate, covering them completely. Return these back to the lined baking sheet again, as you did before, achieving a lovely layered effect with your delicious Oreo Balls.
Step 9: Decorate the Treats
For an aesthetic flourish, drizzle contrasting chocolate over each Oreo Ball using a piping bag or fork. This adds a decorative element and allows you to get creative with your presentation, making these treats even more enticing for gatherings or gifts.
Step 10: Chill to Set
Finally, pop the decorated Oreo Balls back into the refrigerator for an additional 30 minutes until the chocolate coating sets completely. The finished product should have a firm, delectable exterior, providing the perfect contrast to the creamy, melt-in-your-mouth center.
Expert Tips for the Best Oreo Balls
-
Quality Ingredients: Use high-quality Oreos and chocolate wafers for a richer flavor; this makes a noticeable difference in your Oreo Balls.
-
Crumb Consistency: Ensure that the Oreos are crushed into a fine, even crumb for the best texture; larger chunks will make it harder to form and coat the balls.
-
Chill Time is Key: Don’t skip the chilling step! It helps firm up the Oreo mixture, making it easier to handle and ensuring a smooth chocolate coating.
-
Beautiful Coating: When dipping in chocolate, allow excess to drip off to avoid thick clumps. A thin layer gives a lovely shiny finish to your Oreo Balls.
-
Experiment & Personalize: Feel free to add your unique touch with toppings or different cookie flavors to create your ideal Oreo Balls recipe!
What to Serve with Easy No-Bake Oreo Balls?
Transform your dessert experience by pairing these indulgent treats with delightful companions that elevate every bite.
-
Fresh Berries: The tartness of raspberries or strawberries cuts through the richness of the truffles, refreshing your palate beautifully. Imagine a sweet, juicy burst against the chocolatey decadence!
-
Whipped Cream: Light and airy, this classic topping adds a creamy contrast that enhances the overall flavor. A dollop goes a long way in amplifying the dessert experience.
-
Coffee or Espresso: A robust cup balances the sweetness of the Oreo Balls, providing a perfect after-dinner companion. The rich notes of coffee beautifully complement the chocolate flavors.
-
Ice Cream: The creamy texture pairs delightfully with the fudgy centers of the truffles. Consider a scoop of vanilla or cookies and cream for extra indulgence!
-
Chocolate Sauce: Drizzling warm chocolate sauce over your Oreo Balls brings an extra layer of sweetness and richness. It’s a chocolaty dream that’s hard to resist!
-
Nutty Toppings: A sprinkle of chopped nuts, like almonds or hazelnuts, adds a delightful crunch and earthy flavor. This contrast in texture makes every bite interesting and satisfying.
Storage Tips for Oreo Balls
Fridge: Keep your Oreo Balls in an airtight container in the refrigerator for up to 2 weeks. This preserves their freshness while allowing the flavors to meld beautifully.
Freezer: For longer storage, freeze the Oreo Balls in a single layer on a baking sheet until firm, then transfer to an airtight container. They can last for up to 2 months.
Thawing: When you’re ready to enjoy them, simply transfer the desired amount to the fridge to thaw overnight before serving. This helps maintain their delightful texture.
Reheating: While these treats are best served cold, if you prefer a softer bite, allow them to sit at room temperature for about 15 minutes before indulging in your Oreo Balls.
Oreo Balls Recipe: Customizable Fun!
Dive into a world of creativity as you make these delightful Oreo Balls your own with unique twists and variations!
-
Flavored Cookies: Try using different flavored cookies, like vanilla or peanut butter, for a personal touch. The world of cookie flavors is vast—experimentation leads to delicious discoveries!
-
Nutty Crunch: Incorporate finely chopped nuts, such as almonds or walnuts, into the Oreo mixture for added texture and a delightful crunch. This little addition brings another layer of flavor that makes your Oreo Balls extraordinary.
-
Flavorful Extracts: Add a splash of vanilla or almond extract in the cream cheese mixture to elevate the overall taste. A simple extract can transform your treat into a gourmet experience that lingers on the palate.
-
Colorful Coatings: Swap dark chocolate for colorful candy melts to celebrate special occasions. Whether it’s pastel pinks for spring or vivid reds for a holiday, dressing your Oreo Balls in festive colors will wow your guests.
-
Minty Freshness: Mix in a bit of peppermint extract for a refreshing holiday twist or top with crushed candy canes. It’s an uplifting flavor that pairs beautifully with the rich chocolate.
-
Decadent Drizzles: Use dark chocolate or white chocolate drizzle over the truffles for an artistic flair. This not only enhances the visual appeal but adds an exponential layer of chocolate goodness.
-
Spice it Up: Incorporate a pinch of cinnamon or nutmeg into your mixture for an extra depth of flavor. These warm spices add holiday cheer and are a wonderful surprise in a sweet treat.
-
Sweet Dipping Sauce: Serve with a side of warm chocolate or caramel sauce for extra indulgence. A little dip goes a long way in satisfaction, creating a fabulous experience at any gathering.
For more delicious ideas or variations, explore my Sweet and Sour Chicken or try your hand at Freakin Fried Rice! No matter how you choose to personalize your Oreo Balls, enjoy the process of creating a treat that reflects your taste and flair!
Make Ahead Options
These delightful Oreo Balls are perfect for meal prep enthusiasts! You can prepare the Oreo mixture—by crushing Oreos and blending them with cream cheese—up to 24 hours in advance, simply refrigerate it in an airtight container. Form the balls and chill them for an hour, then dip in chocolate and decorate as usual when ready to serve. For optimal quality, don’t coat them in chocolate until you’re set to serve so they stay fresh and glossy. Enjoy the flexibility of making these ahead, ensuring you have a tempting treat on hand with minimal effort on busy days!

Oreo Balls Recipe FAQs
How do I know if my Oreos are fresh enough to use?
Absolutely! Check for freshness by looking for any visible dark spots all over the package or a stale smell. If they’re still crunchy and taste as expected, you’re good to go! For the best results, use Oreos that have not exceeded their expiration date.
How should I store my Oreo Balls to keep them fresh?
You should keep your Oreo Balls in an airtight container in the refrigerator for up to 2 weeks. Layer them carefully to avoid sticking. This preserves their delightful texture and flavor, giving you a satisfying treat whenever you crave it!
Can I freeze Oreo Balls, and if so, how?
Yes, you can freeze your Oreo Balls! First, place them in a single layer on a baking sheet and freeze until they are firm—this should take about 1-2 hours. After that, transfer them to an airtight container and store them in the freezer for up to 2 months. When you’re ready to enjoy them, simply thaw them in the fridge overnight before serving.
What if my Oreo mixture is too moist to form balls?
No worries! If your Oreo mixture feels too soft and sticky, allow it to chill in the fridge for about 30 minutes. This will firm it up and make it easier to roll into balls. If it’s still a bit squishy, try adding a tablespoon of crushed Oreos to help absorb the excess moisture.
Are Oreo Balls safe for people with allergies?
It’s important to note that Oreo Balls contain ingredients that might trigger allergies, like dairy and gluten. If you’re making these for someone with dietary restrictions or allergies, consider using gluten-free Oreos and dairy-free cream cheese to cater to their needs. Always double-check labels for potential allergens to be safe.
Can I use other types of cookies besides Oreos?
Very! This recipe is wonderfully versatile. You can replace Oreos with other sandwich cookies, like peanut butter cookies or even gluten-free varieties. The key is to use a cookie that has a similar texture to maintain the creamy center, ensuring a delicious result every time you whip up your Oreo Balls Recipe!
Decadent Oreo Balls Recipe: No-Bake Bliss in Every Bite
Ingredients
Equipment
Method
- Crush the Oreos in a food processor until finely textured.
- Mix softened cream cheese with Oreo crumbs until well combined.
- Form the mixture into 1-inch balls and place on a lined baking sheet.
- Chill the formed Oreo balls in the refrigerator for at least 1 hour.
- Melt dark chocolate melting wafers in a microwave-safe bowl until smooth.
- Dip half of the chilled Oreo balls into the melted dark chocolate.
- Melt white chocolate wafers in the same method as dark chocolate.
- Dip the remaining Oreo balls into the melted white chocolate.
- Decorate the treats with drizzles of contrasting chocolate.
- Chill the decorated Oreo Balls in the refrigerator for 30 minutes to set.
Leave a Reply