
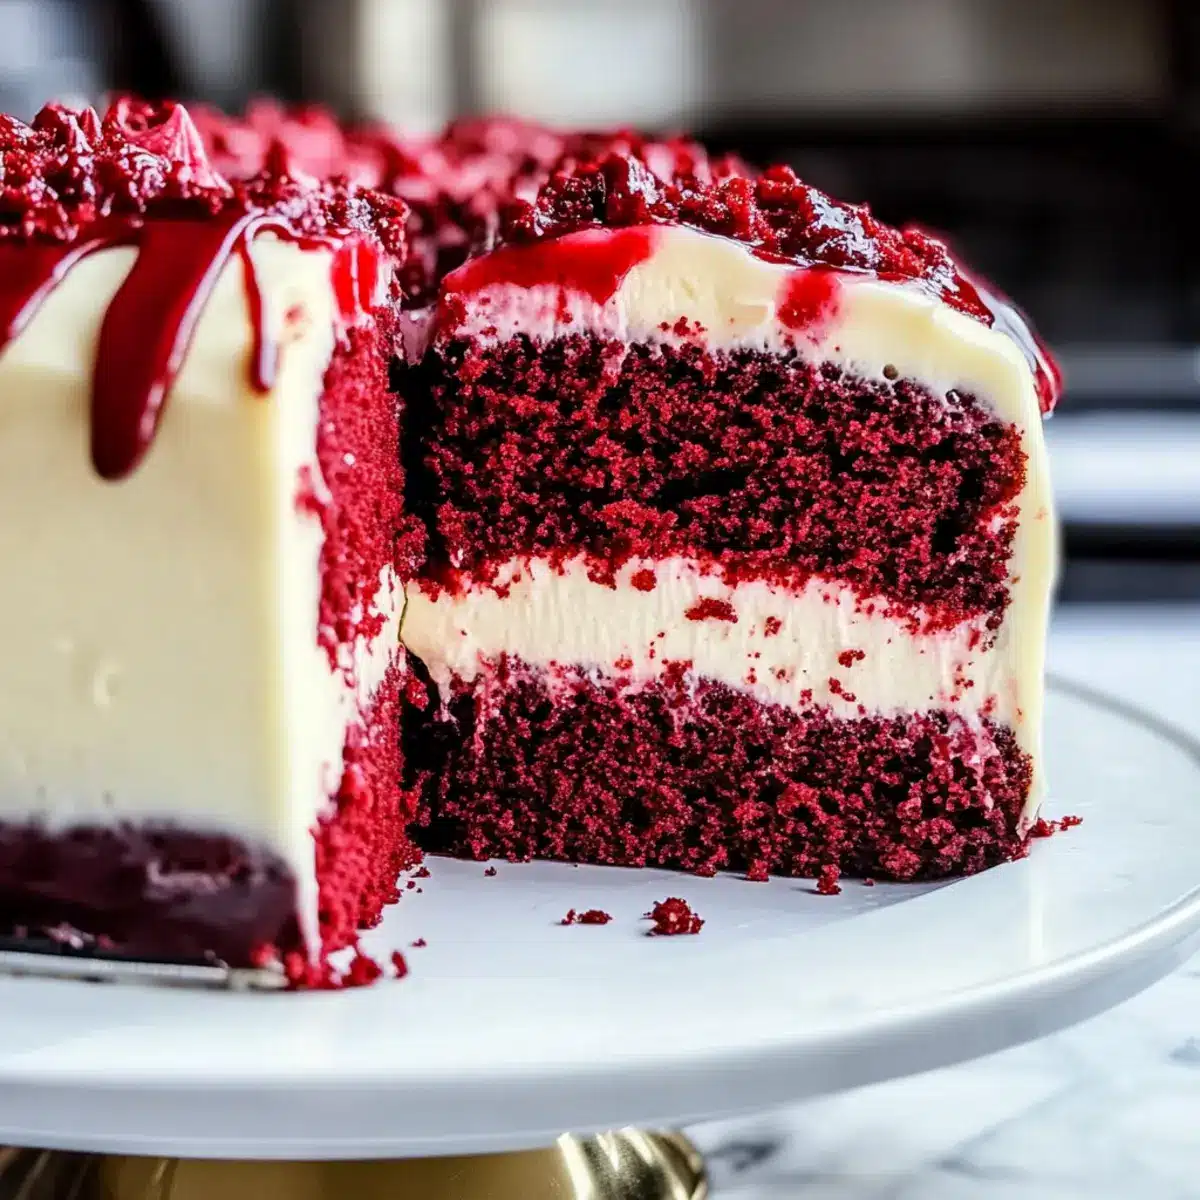
As I sifted through the flour and cocoa, an unexpected thought crossed my mind—what if I could elevate a classic dessert to an unforgettable level? Enter the show-stopping Red Velvet Cheesecake Cake! This delightful creation features a soft and luscious red velvet cake paired with a creamy cheesecake filling, making it perfect for birthdays, anniversaries, or a cozy gathering with friends. Not only is it easy to whip up, but it’s also visually stunning, guaranteed to impress your guests and satisfy your sweet tooth. Baking this cake is not just about the ingredients; it’s about creating memories around something delicious. Ready to bring a little magic into your kitchen? Let’s dive into this recipe and discover the joy of creating a dessert that truly shines!
Why is this cake a must-try?
Decadent Layers: The combination of a velvety red velvet cake and a creamy cheesecake center creates an impressive dessert that’s hard to resist.
Easy to Make: Even beginner bakers can tackle this recipe with confidence, thanks to its straightforward steps.
Party-Ready Appeal: This stunning cake is perfect for celebrations—whether it’s a birthday or an anniversary, everyone will be talking about it.
Versatile Variations: Feel free to switch things up by using chocolate cake mix or adding festive spices to the cheesecake layer; the possibilities are endless!
Chill and Serve: Make it ahead of time! This cake can be stored for up to 4 days in the fridge, letting you plan your gatherings stress-free.
If you’re in the mood for other delightful desserts, check out my Warm Caramel Cake or the rich Neiman Marcus Cake for more sweet inspiration!
Red Velvet Cheesecake Cake Ingredients
For the Cake Layers
- Red Velvet Cake Mix – The foundation of this delightful dessert; you can use a homemade red velvet cake recipe for a personal touch.
- Eggs (3 large) – These add moisture and binding; for a vegan alternative, consider using flax eggs.
- Water (1 cup) – Essential for activating dry ingredients and keeping the cake moist; no substitutions here.
- Oil (1/2 cup) – Provides richness and moisture; melted butter can be used for a flavor twist.
For the Cheesecake Filling
- Cream Cheese (8 ounces; room temperature) – This is the heart of the cheesecake layer; you might use Neufchâtel cheese for a lighter version.
- Sour Cream (1/4 cup; room temperature) – Adds a delightful tang and moisture; no substitutions recommended.
- Granulated Sugar (1/4 cup) – Sweetens the cheesecake filling perfectly; keep it as is for the best results.
- Egg (1 large; for cheesecake batter) – Adds richness and structure; silken tofu is a great substitute for a vegan option.
- Vanilla Extract (1 teaspoon) – Enhances the flavor of the cheesecake; another great choice for a more gourmet touch.
For the Frosting
- Cream Cheese (4 ounces for frosting) – Forms the base of the frosting, ensuring it’s creamy and satisfying; no substitutes needed.
- Unsalted Butter (4 tablespoons; room temperature) – Creates a rich, smooth frosting; vegan butter can be swapped in for a dairy-free option.
- Powdered Sugar (2 cups) – Sweetens and thickens the frosting to perfection; you’ll want to keep this as is.
- Salt (1/4 teaspoon) – Balances the sweetness in the frosting beautifully; no substitutions here.
Ready to whip up your Red Velvet Cheesecake Cake? Gather these ingredients and let’s get started on creating something truly magical for your celebrations!
Step‑by‑Step Instructions for Red Velvet Cheesecake Cake
Step 1: Preheat the Oven
Begin by preheating your oven to 350°F (175°C). While the oven warms up, prepare two 9-inch round cake pans by greasing them lightly and lining the bottoms with parchment paper for easy removal later. This will ensure that your Red Velvet Cheesecake Cake layers bake evenly and release from the pans without sticking.
Step 2: Prepare the Cake Layers
In a large mixing bowl, combine the red velvet cake mix, three large eggs, one cup of water, and half a cup of oil. Using an electric mixer, beat the mixture on medium speed until it’s smooth and well-combined, about 2 minutes. Once ready, pour the batter evenly into the prepared cake pans and bake for 25 to 30 minutes. The cakes are done when a toothpick inserted into the center comes out clean, so keep an eye on them!
Step 3: Cool the Cake Layers
Once the cakes are out of the oven, allow them to cool in their pans for 10 minutes. Then, carefully turn them out onto wire racks to cool completely. Make sure they are set aside to cool for at least an hour. Cooling properly is crucial to prevent your Red Velvet Cheesecake Cake from becoming mushy when you layer it up.
Step 4: Make the Cheesecake Filling
While the cakes are cooling, it’s time to make the cheesecake filling. In a medium bowl, beat eight ounces of room temperature cream cheese with an electric mixer until smooth. Add the quarter cup of sour cream, one-fourth cup of granulated sugar, one large egg, and one teaspoon of vanilla extract. Mix just until combined; overmixing can lead to cracks in your cheesecake layer, so be gentle.
Step 5: Assemble the Cake
Once your cake layers are completely cooled, it’s time to assemble your masterpiece. Pour half of the cheesecake filling onto the top of one cake layer, smoothing it out evenly. Place the second cake layer on top and pour the remaining cheesecake filling over this layer, ensuring it’s spread evenly. This beautiful assembly is what transforms your Red Velvet Cheesecake Cake into a stunning, layered treat.
Step 6: Bake the Assembled Cake
Preheat your oven to 325°F (163°C) for this step. Place the assembled cake in the oven and bake for another 25 to 30 minutes. You’ll know it’s done when the cheesecake layer is set and slightly jiggles when you gently shake the pan. This lower temperature helps to ensure a smooth cheesecake layer without cracking.
Step 7: Prepare the Frosting
After the cake bakes and cools completely, make your delicious frosting. In a medium bowl, beat four ounces of cream cheese and four tablespoons of room temperature unsalted butter until it’s creamy and fluffy. Gradually add in two cups of powdered sugar, quarter teaspoon of salt, and two teaspoons of vanilla extract, mixing until the frosting is light and smooth, perfect for enhancing your cake.
Step 8: Frost the Cake
Finally, take your cooled Red Velvet Cheesecake Cake and use a spatula to spread the cream cheese frosting evenly over the top and sides of the cake. Be as generous as you like, letting the frosting showcase the beautiful layers beneath. For best results, chill the frosted cake in the refrigerator for at least one hour before slicing—it helps the layers to meld together beautifully and makes for cleaner slices!
Expert Tips for Red Velvet Cheesecake Cake
-
Room Temperature Ingredients: Ensure all your ingredients, especially the cream cheese and eggs, are at room temperature for a smooth batter without lumps.
-
Avoid Overmixing: When preparing the cheesecake filling, mix just until combined to prevent air bubbles that can lead to cracks in your cheesecake layer.
-
Lower Baking Temperature: Baking the cheesecake layer at 325°F allows it to set evenly without cracking. Keep an eye on it toward the end for a slight jiggle!
-
Chilling Time: After frosting, chill the cake for at least an hour to help the layers set together and make slicing easier.
-
Use Parchment Paper: Lining your cake pans with parchment paper ensures the cakes release easily, preserving their perfect shape for the stunning presentation of your Red Velvet Cheesecake Cake.
What to Serve with Decadent Red Velvet Cheesecake Cake
Indulge in a delightful culinary adventure as you complement this stunning dessert with the perfect pairings.
-
Fresh Berries: Their juicy tartness cuts through the creamy richness, providing a bright contrast that refreshes the palate.
-
Vanilla Ice Cream: A scoop of creamy vanilla ice cream adds a luscious touch; its coolness beautifully balances the warm flavors of the cake.
-
Chocolate Drizzle: A simple drizzle of melted chocolate enhances the cake’s decadence; a sweet, rich finish that keeps guests coming back for more.
-
Mint Leaves: A sprinkle of fresh mint not only adds a pop of color but also infuses a refreshing note that elevates the dessert experience.
-
Whipped Cream: Light and airy whipped cream adds fluffy texture, softening the dish while enhancing the overall flavor profile in every bite.
-
Coffee or Espresso: A hot cup of coffee or a shot of espresso pairs wonderfully, enhancing the sweet flavors and providing a moment of cozy warmth.
This wide assortment of pairings will not only make your Red Velvet Cheesecake Cake the star of the show but will also create a memorable dining experience for all your guests!
How to Store and Freeze Red Velvet Cheesecake Cake
Fridge: Store the cake in an airtight container for up to 4 days. Chilling helps maintain its creamy texture and flavor.
Freezer: Wrap the cake tightly in plastic wrap and foil before freezing. It can be frozen for up to 2 months. Thaw it overnight in the fridge before serving.
Cut Portions: If you prefer, slice the cake into portions before freezing. This allows for easy access to individual servings of your delightful Red Velvet Cheesecake Cake.
Reheating: If desired, let slices come to room temperature or gently microwave for a few seconds before enjoying, to enhance that luscious creaminess.
Red Velvet Cheesecake Cake Variations
Feel inspired to put your own spin on this delightful dessert—let your creativity shine through every slice!
- Chocolate Twist: Replace red velvet cake mix with chocolate cake mix for a rich and indulgent flavor.
- Minty Fresh: Incorporate crushed peppermint candy into the cheesecake layer for a refreshing holiday touch.
- Spiced Delight: Add cinnamon or nutmeg to the batter for a warm, cozy flavor during festive gatherings.
- Nutty Crunch: Stir in chopped walnuts or pecans into the cheesecake filling for a delightful texture contrast.
- Lighter Frosting: Swap out some butter in the frosting for whipped cream for a lighter, airy finish.
- Gourmet Flavors: Use flavored extracts like almond or hazelnut to add a unique twist to the frosting.
- Fruit Fusion: Top the cake with fresh berries or a homemade berry compote for a burst of color and flavor.
- Layered Surprise: Add layers of fresh fruit between the cake and cheesecake layers to surprise your guests with another delicious element.
If you want more sweet inspiration, consider trying my Chocolate Pretzel Cupcakes or my festive Christmas Tree Cupcake recipes to elevate your baking adventures!
Make Ahead Options
These Red Velvet Cheesecake Cakes are perfect for meal prep, allowing you to enjoy more time with your loved ones! You can bake the cake layers up to 24 hours in advance; simply allow them to cool completely, wrap them tightly in plastic wrap, and refrigerate. The cheesecake filling can also be prepared 1-2 days ahead; store it in an airtight container in the fridge, and when ready to assemble, follow the baking instructions as directed. To maintain quality, avoid overmixing the cheesecake filling to prevent cracks. When you’re ready to serve, frost the cake and chill for at least an hour to achieve that perfect slice!
Red Velvet Cheesecake Cake Recipe FAQs
What is the best way to choose ripe ingredients for this cake?
When selecting ingredients like eggs and cream cheese, ensure they are fresh and at room temperature for optimal mixing. For the best results, check cream cheese for any discoloration or lumps, and choose eggs that are clean and uncracked.
How should I store leftover Red Velvet Cheesecake Cake?
To keep your cake fresh, store it in an airtight container in the refrigerator for up to 4 days. This will help preserve the creamy texture and maintain the flavor. If you want to prepare ahead, chill your slices carefully so they don’t stick together.
Can I freeze the Red Velvet Cheesecake Cake?
Absolutely! Wrap the cake tightly in plastic wrap and then in aluminum foil to prevent freezer burn. You can freeze it for up to 2 months. When you’re ready to enjoy, simply thaw it overnight in the refrigerator, allowing the flavors to blend beautifully.
What if my cheesecake layer cracks during baking?
No worries! A cracked cheesecake layer can happen even to the best of us. To avoid this, mix your filling gently and bake at a lower temperature (325°F). If cracks do appear, you can cover them up with frosting when you layer it or sprinkle some chocolate shavings on top for a delightful finish.
Are there any dietary considerations I should be aware of?
If you or your guests have dietary restrictions, you can make this cake accessible! Use flax eggs for a vegan version or Neufchâtel cheese instead of regular cream cheese for a lighter option. Just be sure to inform your guests about any substitutions made to accommodate allergies.
Can I prepare the cake layers in advance?
Definitely! You can bake and cool the cake layers a day in advance. Just wrap them in plastic wrap and store them in the refrigerator until you’re ready to assemble the cake. This way, you can save time on the day of your celebration and focus on the fun part—frosting!
Irresistible Red Velvet Cheesecake Cake for Every Celebration
Ingredients
Equipment
Method
- Preheat your oven to 350°F (175°C) and prepare two 9-inch round cake pans by greasing them and lining the bottoms with parchment paper.
- In a mixing bowl, combine the red velvet cake mix, eggs, water, and oil. Beat on medium speed until smooth, about 2 minutes.
- Pour the batter into the prepared cake pans and bake for 25 to 30 minutes. A toothpick should come out clean when inserted.
- Allow the cakes to cool in their pans for 10 minutes, then transfer them to wire racks to cool completely.
- In a medium bowl, beat the cream cheese until smooth. Add sour cream, sugar, egg, and vanilla; mix until just combined.
- Place one cooled cake layer on a serving plate. Spread half of the cheesecake filling over the top, then add the second cake layer and spread the remaining filling.
- Preheat your oven to 325°F (163°C). Bake the assembled cake for another 25 to 30 minutes until the cheesecake layer is set.
- Beat cream cheese and butter until creamy, then add powdered sugar and salt, mixing until smooth.
- Spread the frosting evenly over the cooled cake. Chill for at least an hour before slicing.
Leave a Reply