
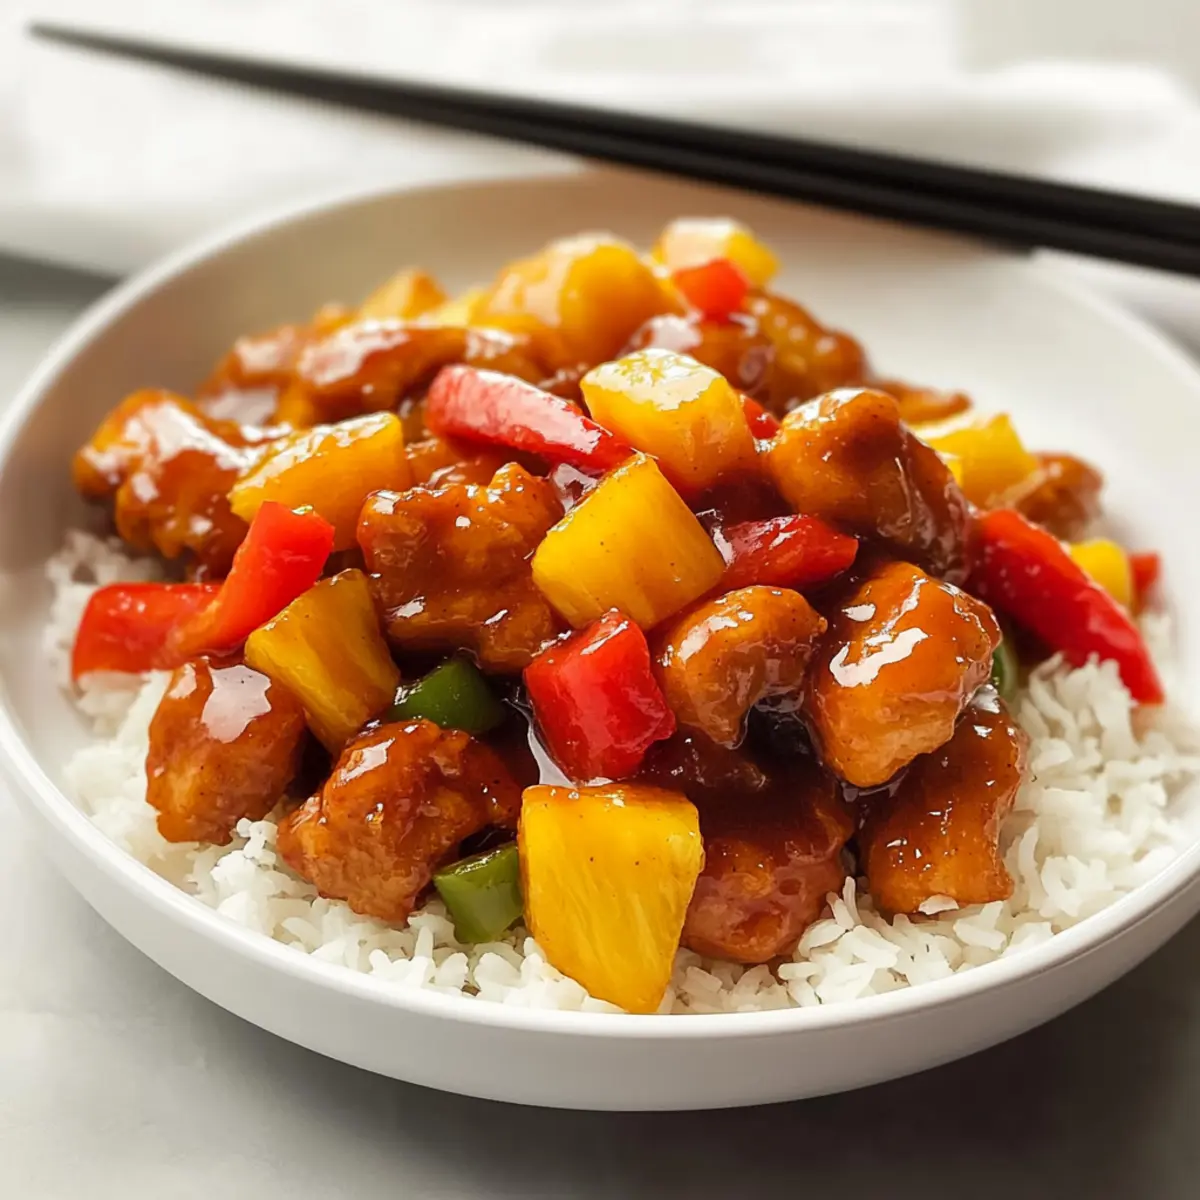
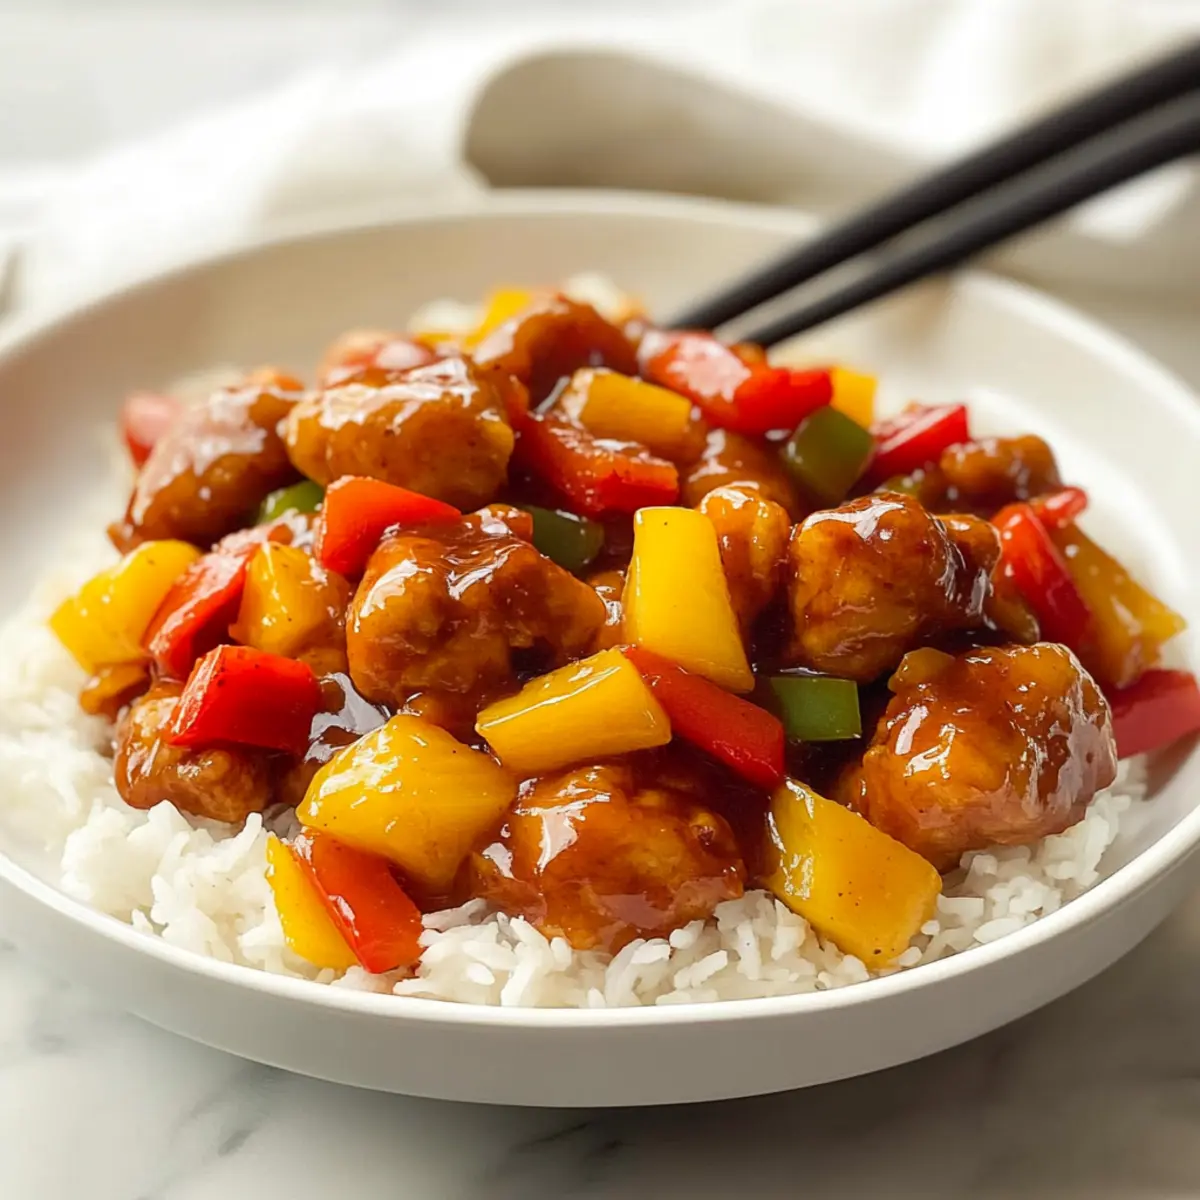
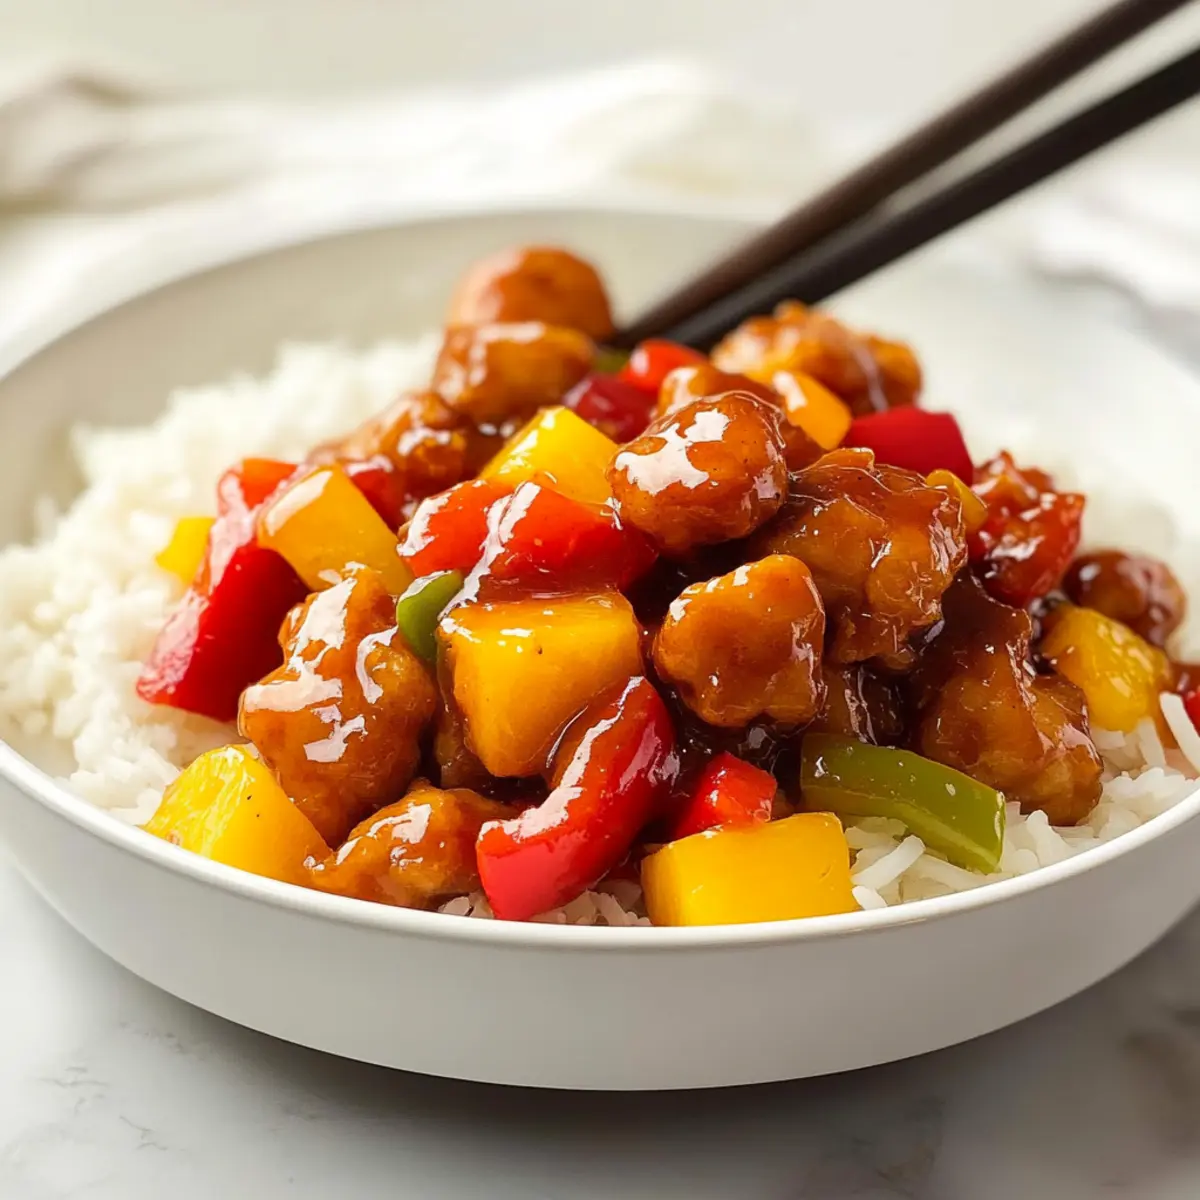
There’s something magical about walking into a kitchen filled with the fragrant aroma of a homemade dish coming together. My latest adventure led me to embrace the vibrant, tangy flavors of a classic Sweet and Sour Chicken Recipe. This easy recipe transforms crispy chicken pieces into a delectable mix of fresh pineapples and colorful bell peppers, all enveloped in a herby, sweet sauce. Not only does it satisfy those takeout cravings at a fraction of the price, but it’s also a healthier, homemade option that your family will love. With versatile substitutions like swapping pineapples for mangoes, you’ll have a dish that’s not just delicious, but also tailored to your taste. Are you ready to dive into this culinary journey and impress your friends with your very own take on this beloved dish?
Why is this Sweet and Sour Chicken special?
Crispy, Juicy Chicken: The secret lies in the perfectly fried chicken, creating an irresistible crispy coating that locks in flavor.
Customizable Ingredients: Tailor your dish easily by swapping pineapples for mangoes or adding your favorite vegetables such as zucchini—your kitchen, your rules!
Quick and Easy: This recipe ensures dinner is served in no time, thanks to simple, fast steps that make cooking fun, not stressful.
Family-Friendly: Kids and adults alike will fall in love with the comforting mix of sweet and tangy flavors, making this dish a crowd-pleaser for any meal.
Healthier Alternative: Enjoy the taste of takeout without the guilt! You can keep things light by using air-fried chicken or opting for less sugar in the sauce.
Perfect for Meal Prep: This Sweet and Sour Chicken reheats beautifully, meaning you can enjoy it for lunch or dinner throughout the week—definitely a win in my book! For more delicious options, check out my Smothered Chicken Rice recipe to keep the flavor excitement going!
Sweet and Sour Chicken Ingredients
For the Chicken
• Boneless Skinless Chicken Thighs – The juiciest option for a hearty base; chicken breasts or shrimp can also work well.
• Eggs – Binds the crispy coating to the chicken; for a vegan touch, consider a flax egg.
• Cornstarch and Flour – Essential for that irresistible crunch; try gluten-free flour if needed.
For the Sauce
• Ketchup – Introduces a sweet and tangy profile; tomato sauce can substitute in a pinch.
• Rice Vinegar – Adds a wonderful tang; white vinegar is a stronger alternative.
• Brown Sugar and Sugar – Balances acidity in the sauce; swap for honey or coconut sugar for a healthier option.
• Grated Ginger – Brings warmth and spice; use ground ginger if you’re in a jam and start with less.
• Minced Garlic – Deepens flavor; garlic powder in a pinch can work fine.
• Chicken Base (Better Than Bouillon) – Enhances overall flavor; vegetable broth provides a vegetarian option.
For the Vegetables
• Bell Peppers – Add vibrant color and crunch; swap with carrots or broccoli for different textures.
• Red Onions – Infuses mild sweetness; substitute with yellow or white onions based on availability.
• Pineapple – Offers sweetness and acidity; mango is a delightful substitute for a tropical twist.
Optional Add-Ins
• Crushed Red Pepper or Cayenne – For those who like it spicy; adjust to your heat preference.
• Additional Veggies – Feel free to toss in zucchini or snap peas for added nutrition and sweetness.
Step‑by‑Step Instructions for Sweet and Sour Chicken Recipe
Step 1: Prep the Chicken
Start by cutting the boneless skinless chicken thighs into 1-inch pieces, placing them in a bowl. Season the chicken generously with salt and pepper before coating it in beaten eggs for a flavorful binding agent. Cover the bowl with plastic wrap and refrigerate for about 15 minutes to ensure the flavors meld.
Step 2: Chop Veggies
While the chicken is marinating, dice the bell peppers, pineapple, and red onions into 1-inch pieces. The colorful veggies will provide a delightful crunch and complement the Sweet and Sour Chicken beautifully. Set aside the chopped ingredients in separate bowls, ready for quick assembly.
Step 3: Make the Sauce
In a medium mixing bowl, combine the ketchup, rice vinegar, brown sugar, grated ginger, minced garlic, and chicken base to create a luscious sauce. Whisk until well blended, ensuring there are no lumps. Set the sauce aside for now, as it will elevate the flavor profile of our Sweet and Sour Chicken recipe.
Step 4: Create a Slurry
Take about a quarter of the sauce you prepared and pour it into a small bowl. Mix in cornstarch until smooth—this will form your slurry, which will help thicken the sauce when combined with the sautéed vegetables later on. Set this aside and keep it handy for the next step.
Step 5: Dredge Chicken
For the crispy coating of your Sweet and Sour Chicken, prepare a dredging station by mixing cornstarch and flour in another shallow dish. Take each marinated chicken piece one at a time, coating it in the mixture thoroughly before placing it on a parchment-lined tray. This will ensure an even crunch when frying.
Step 6: Fry Chicken
In a large skillet, heat oil to 350°F (175°C) over medium-high heat. Fry the chicken pieces in batches for 3 to 4 minutes, turning occasionally until they are golden brown and crispy. Use a slotted spoon to remove them from the oil, letting them drain on paper towels to absorb excess grease, achieving that perfect crunch.
Step 7: Sauté Vegetables
In the same skillet, after draining excess oil, add the chopped bell peppers, pineapple, and red onions. Sauté over medium heat for about 5 minutes or until they become tender yet still vibrant. This process enhances the flavors and will meld beautifully with the sauce when added.
Step 8: Combine
Pour the prepared sauce into the skillet with the sautéed vegetables and bring to a gentle boil over medium heat. Then, quickly stir in the prepared slurry, cooking for about 2 minutes until the sauce thickens and is bubbling, enveloping the vegetables in a wonderful glaze. Now, add the fried chicken pieces to the skillet, allowing them to heat through for another minute.
Step 9: Serve
Finally, plate your luscious Sweet and Sour Chicken alongside steaming jasmine or basmati rice. Garnish with additional vegetables or fresh herbs for a burst of color and flavor. Your homemade feast is now ready to be enjoyed, bringing the taste of a favorite takeout right to your dining table!
Sweet and Sour Chicken Variations
Customize your Sweet and Sour Chicken to match your taste buds and dietary needs—let your creativity shine through in the kitchen!
- Mango Twist: Swap fresh pineapples for juicy mangoes to add a delightful tropical sweetness. Your taste buds will be dancing with joy!
- Veggie Boost: Substitute bell peppers with any favorite veggies like snap peas or zucchini for extra crunch and color in this delicious dish.
- Shrimp Delight: For a lighter option, replace chicken with shrimp for a lovely seafood twist that pairs beautifully with the sweet and sour sauce.
- Air-Fried Version: Use an air fryer to prepare the chicken for a healthier alternative, achieving that delightful crunch using little to no oil.
- Spicy Kick: Add cayenne pepper or crushed red pepper flakes to the sauce for those who crave a bit of heat. It’s a simple way to amp up the flavor!
- Gluten-Free Adaptation: Swap regular flour and cornstarch with gluten-free flour options to adapt this dish for gluten-sensitive family members.
- Honey Sweet: Replace brown sugar with honey for a natural sweetener that melds beautifully with the tangy sauce. It’s an easy swap that enhances flavor!
- Vegetarian Version: Use tofu or tempeh instead of chicken and sauté it until golden for a satisfying, plant-based adaptation that everyone will love.
For more inventive meal ideas, don’t miss out on my Honey Bbq Chicken for a sweet and savory flavor explosion!
How to Store and Freeze Sweet and Sour Chicken
Fridge: Store leftover Sweet and Sour Chicken in an airtight container for up to 3 days; this ensures the flavors remain vibrant.
Freezer: Freeze the chicken separately from the sauce in airtight containers for up to 2 months. Thaw overnight in the fridge before reheating.
Reheating: Reheat in the microwave or on the stovetop over medium heat, stirring occasionally, until warmed through. Add a splash of water if the sauce has thickened too much.
Make-Ahead Tips: Prep all ingredients a day ahead, keeping the chicken and sauce stored separately in the fridge for easy cooking when you’re ready.
Expert Tips for Sweet and Sour Chicken
-
Avoid Soggy Coating: Fry chicken in batches, ensuring there’s enough space for each piece. Overcrowding the pan leads to a soggy coating.
-
Check Oil Temperature: Use a thermometer to maintain the oil at 350°F. Too hot can burn the coating; too cool will make it greasy.
-
Adjust Sweetness: Taste the sauce before adding all of the sugar. You can always add more but it’s tough to fix an overly sweet Sweet and Sour Chicken.
-
Perfect Veggie Crunch: Sauté vegetables until just tender to maintain their crunch. This ensures a delightful texture contrast in your dish.
-
Make Ahead Magic: Prepare the chicken and sauce a day in advance, storing them separately for an easy assembly when you’re ready to cook.
-
Experiment with Flavors: Don’t hesitate to add spices like cayenne or crushed red pepper to the sauce for an extra kick in your Sweet and Sour Chicken recipe.
What to Serve with Homemade Sweet and Sour Chicken?
For a delightful dining experience, complementing your colorful, tangy dish with the right sides can elevate your meal beyond ordinary.
-
Steamed Jasmine Rice: The fluffy, aromatic rice absorbs the sauce beautifully, allowing you to savor every bite of the sweet and sour goodness. For a touch of exotic flavor, consider infusing the rice with a bit of coconut milk.
-
Crispy Vegetable Spring Rolls: These light bites provide a crunchy texture contrast alongside the tender chicken. Their subtle taste makes them a perfect companion, ready to be dipped in sweet chili sauce for an added flavor twist.
-
Sautéed Broccoli: Bright green, lightly steamed broccoli adds vibrant color and nutrients to your plate. Its slight bitterness beautifully balances the sweetness of the chicken, making every mouthful satisfying.
-
Coconut Rice: Infused with creamy coconut milk, this option combines sweetness with a slight nuttiness, perfectly complementing the sweet and sour profile while adding an exotic twist.
-
Garlicky Stir-Fried Bok Choy: This crisp, leafy vegetable has a delightful crunch that pairs perfectly with the sauce’s texture. The garlic enhances the overall flavor, creating a harmonious balance on your plate.
-
Chilled Cucumber Salad: Light and refreshing, this salad offers a crisp contrast to the warm chicken. Toss cucumbers with rice vinegar for a tangy kick that complements the meal beautifully.
-
Crispy Egg Rolls: These savory, crunchy delights are filled with veggies and proteins that echo the heartiness of Sweet and Sour Chicken—your guests may not be able to resist a second serving!
-
Peach Iced Tea: To refresh and cleanse the palate, serve this lightly sweetened drink. It complements the flavors and adds a homemade touch to your meal.
-
Mango Sorbet: To finish the meal on a sweet note, indulge in a refreshing mango sorbet. Its fruity flavor mirrors the sweetness of the dish while providing a cool contrast that rounds out the meal.
Make Ahead Options
These Sweet and Sour Chicken delights are perfect for meal prep enthusiasts! You can chop the vegetables (bell peppers, pineapple, and onions) and store them in airtight containers in the refrigerator up to 3 days in advance. Additionally, prepare the sauce ahead of time and refrigerate it overnight to develop the flavors. For best results, it’s advisable to fry the chicken just before serving to ensure it stays crispy. When you’re ready to enjoy your homemade Sweet and Sour Chicken, simply sauté the prepped vegetables, add the sauce, and finish with the fried chicken to bring it all together in a flash—making your busy weeknights a breeze!
Sweet and Sour Chicken Recipe FAQs
What kind of pineapple should I use?
Absolutely! Fresh pineapple is ideal as it adds the perfect balance of sweetness and acidity to the dish. Look for fruit that feels slightly soft to the touch, indicating ripeness. Avoid pineapples with dark spots or a sour smell.
How long can I store leftover Sweet and Sour Chicken?
I recommend storing your leftovers in an airtight container for up to 3 days in the fridge. Make sure to let it cool completely before sealing it to keep those vibrant flavors intact. When reheating, use medium heat to gently warm it back up without losing that crispy texture.
Can I freeze Sweet and Sour Chicken?
Very! To freeze, separate the chicken from the sauce to maintain the best texture. Place each in airtight containers or freezer bags for up to 2 months. Thaw in the fridge overnight, then reheat on the stovetop or microwave, perhaps adding a splash of water to the sauce if it thickens too much.
What can I do if my chicken coating is soggy after frying?
If you find that your chicken is soggy, it could be due to overcrowding the pan while frying. Always make sure there’s enough space for each piece to cook properly. For future attempts, try frying each batch separately and ensure that your oil is at the right temperature of 350°F for a crispy finish.
Are there any dietary concerns I should consider with this recipe?
Absolutely! Keep in mind that this Sweet and Sour Chicken recipe contains gluten due to the flour and soy sauce, so you can opt for gluten-free flour and a gluten-free soy sauce if necessary. If you’re making this dish for children or adults with allergies, always double-check the ingredients, like the use of eggs, as alternatives can easily be swapped in.
Can I adjust the sweetness of the sauce?
Yes, you absolutely can! Before adding all the sugar, taste the sauce after mixing and adjust according to your preference. If you’re looking for a healthier alternative, consider using honey or coconut sugar for a more natural sweetener response. It’s always easier to add more than to try and fix an overly sweet mix!

Ultimate Sweet and Sour Chicken Recipe for Home Cooks
Ingredients
Equipment
Method
- Start by cutting the boneless skinless chicken thighs into 1-inch pieces, placing them in a bowl. Season the chicken generously with salt and pepper before coating it in beaten eggs for a flavorful binding agent. Cover the bowl with plastic wrap and refrigerate for about 15 minutes.
- While the chicken is marinating, dice the bell peppers, pineapple, and red onions into 1-inch pieces. Set aside the chopped ingredients in separate bowls, ready for quick assembly.
- In a medium mixing bowl, combine the ketchup, rice vinegar, brown sugar, grated ginger, minced garlic, and chicken base to create a luscious sauce. Whisk until well blended, ensuring there are no lumps. Set the sauce aside.
- Take about a quarter of the sauce and pour it into a small bowl. Mix in cornstarch until smooth for your slurry. Set this aside for the next step.
- Prepare a dredging station by mixing cornstarch and flour in another shallow dish. Coat each marinated chicken piece in the mixture before placing it on a parchment-lined tray.
- In a large skillet, heat oil to 350°F (175°C) over medium-high heat. Fry the chicken pieces in batches for 3 to 4 minutes until they are golden brown and crispy. Use a slotted spoon to remove them and let them drain on paper towels.
- In the same skillet, add the chopped bell peppers, pineapple, and red onions. Sauté over medium heat for about 5 minutes or until tender yet still vibrant.
- Pour the prepared sauce into the skillet, bringing it to a gentle boil over medium heat. Quickly stir in the prepared slurry, cooking for about 2 minutes until the sauce thickens. Add the fried chicken pieces, allowing them to heat through for another minute.
- Plate your Sweet and Sour Chicken alongside steaming jasmine or basmati rice, garnishing with additional vegetables or fresh herbs for a burst of color and flavor.
Leave a Reply