
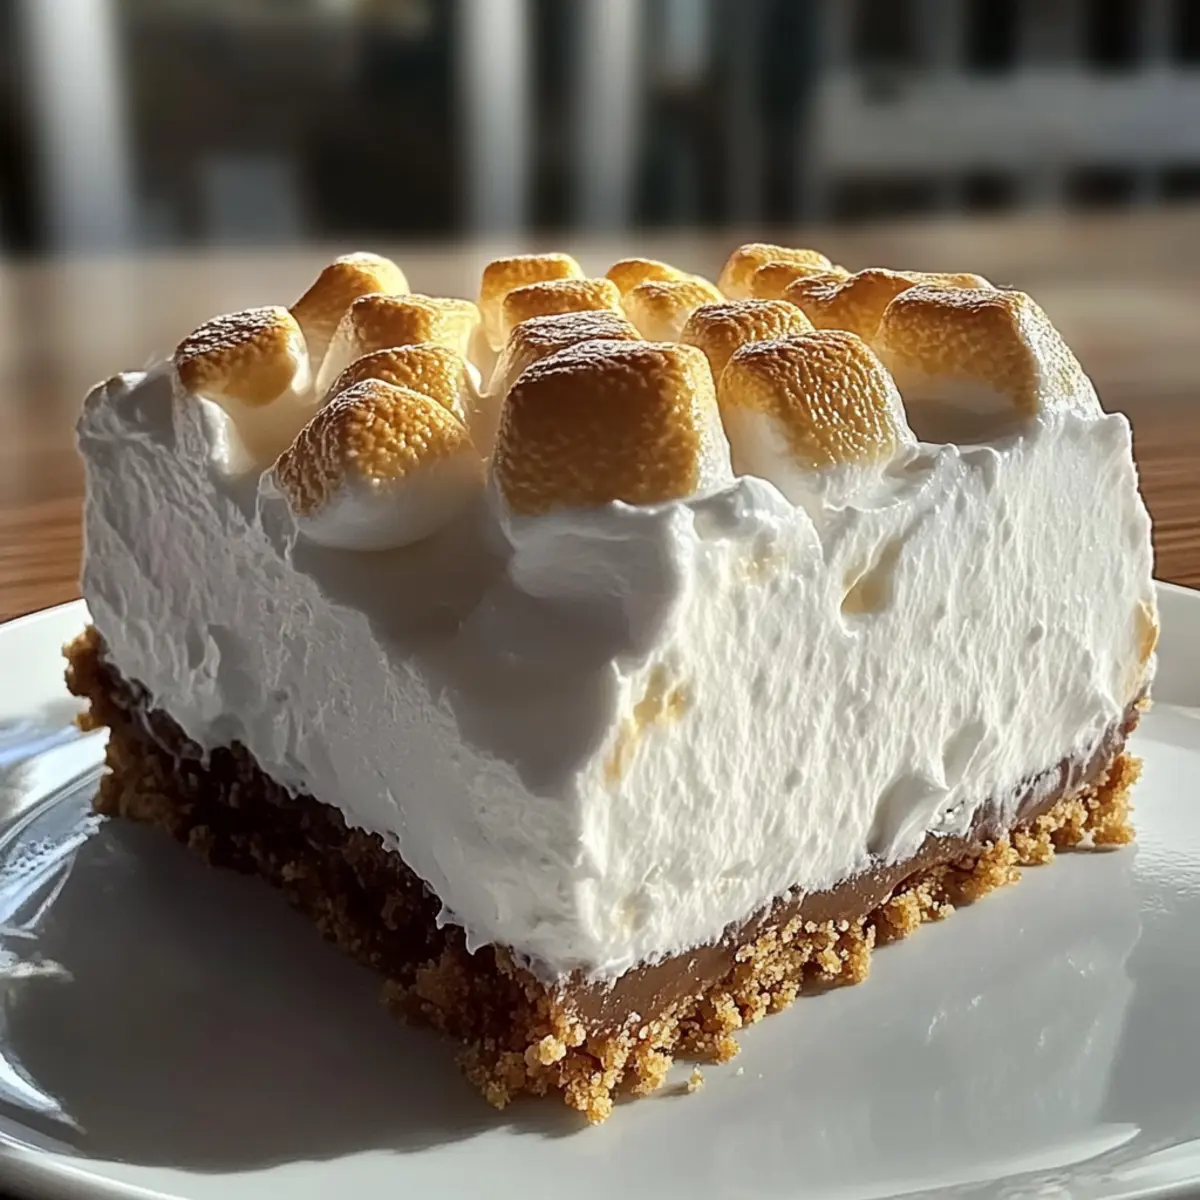
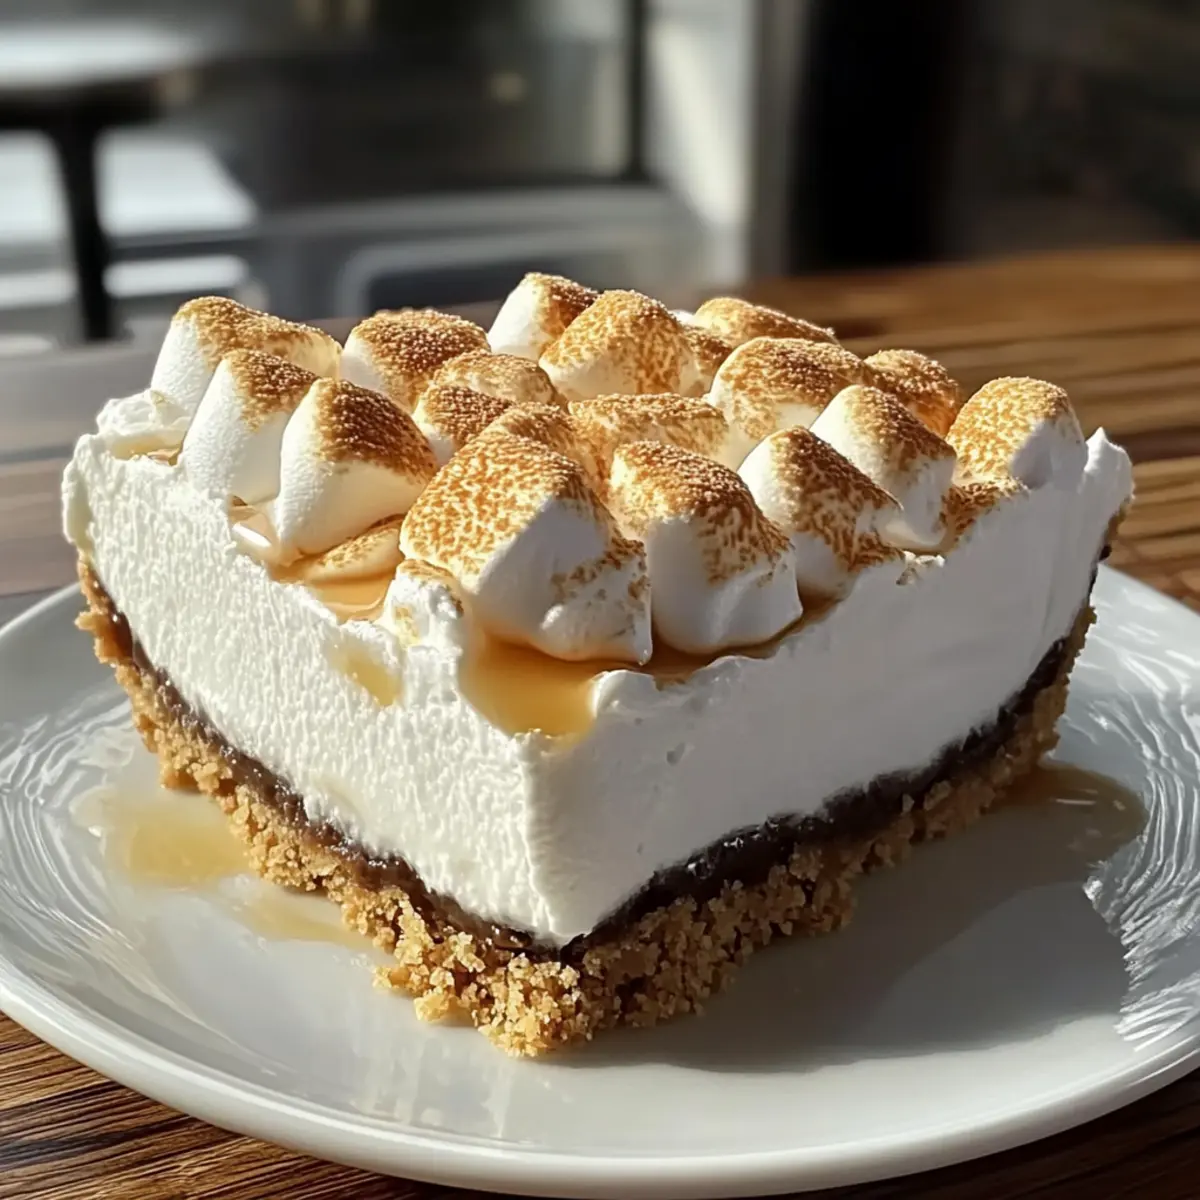
As the first warm rays of summer hit the kitchen, I often find myself in a mini crisis—how can I satisfy my sweet tooth without heating up the house? Enter my No-Bake Marshmallow Cheesecake, a creamy delight that’s perfect for those sweltering days when turning on the oven just isn’t an option. This recipe is a breeze to whip up, making it an ideal choice for potlucks and quick gatherings. With fluffy marshmallows mingling with rich cream cheese for an airy filling, you’ll have a dessert that feels indulgent yet is deceptively simple to create. Plus, it’s vegetarian and can be made ahead of time, leaving you stress-free when it’s time to serve. Intrigued about how this cloud-like cheesecake comes together? Let’s dive into the sweet details!
What Makes This Cheesecake Irresistible?
Effortless Preparation: This No-Bake Marshmallow Cheesecake is incredibly simple to make, allowing both novice and seasoned bakers to whip it up in no time.
Light and Airy Texture: With its creamy filling that feels like a cloud, each bite melts in your mouth, providing a delightful finish to any meal.
Make-Ahead Magic: Perfect for busy schedules, you can prepare this cheesecake up to two days in advance, making it a stress-free option for parties or family gatherings.
Customization Galore: Whether you want to incorporate fresh fruit or drizzle it with chocolate sauce, this dessert is a blank canvas for your creativity, just like our Oreo Tiramisu New.
Crowd-Pleasing Delight: Even the most discerning dessert lovers will be enchanted by its sweet, marshmallow flavor, ensuring it’s a hit every time you serve it.
Enjoy Anytime: Serve chilled, and don’t hesitate to pair it with your favorite toppings, making every slice truly unique!
No-Bake Marshmallow Cheesecake Ingredients
• Here’s everything you need to create this dreamy dessert!
For the Crust
- Graham Crackers – Provides structure and crunch for the cheesecake crust. Substitution: Can use Oreo cookies for a chocolate variant.
- Unsalted Butter – Binds the graham cracker crumbs together. Tip: Melt before mixing for better incorporation.
For the Filling
- Mini Marshmallows – Adds sweetness and cloud-like texture to the filling. Tip: Can substitute with chopped large marshmallows.
- Whole Milk – Helps melt the marshmallows for a smooth filling. No substitutions recommended for best results.
- Cream Cheese – Creates a rich, creamy base for the filling. Tip: Use full-fat for optimal flavor; low-fat can be used in a pinch.
- Vanilla Extract – Enhances the flavor in the filling. No substitutions recommended.
- Heavy Cream – Adds richness and helps achieve a fluffy texture when whipped. Substitution: Half-and-half may work but won’t whip as well.
Use these ingredients to create a delightful No-Bake Marshmallow Cheesecake that everyone will love!
Step‑by‑Step Instructions for No-Bake Marshmallow Cheesecake
Step 1: Prepare the Crust
Begin by crushing about 1 ½ cups of graham crackers in a food processor until they resemble fine crumbs; this should take roughly 1-2 minutes. Melt ½ cup of unsalted butter in the microwave for about 30-40 seconds, then combine it with the crumbs in a mixing bowl. Press this mixture firmly into the bottom of a 9-inch springform pan and refrigerate for at least 30 minutes to set while you prepare the filling.
Step 2: Melt Marshmallows
In a small saucepan, combine 2 cups of mini marshmallows and ½ cup of whole milk over low heat. Stir gently for about 5-7 minutes, or until the marshmallows completely melt and the mixture is smooth and creamy. Once melted, remove from heat and allow it to cool to room temperature, so it won’t melt the cream cheese when combined.
Step 3: Make Filling
In a large mixing bowl, beat 16 ounces of softened cream cheese using an electric mixer on medium speed until smooth and creamy, about 2-3 minutes. Gradually add in the cooled marshmallow mixture and 1 teaspoon of vanilla extract, mixing until well combined and fluffy. This creates the luscious filling for your No-Bake Marshmallow Cheesecake.
Step 4: Whip Cream
In a separate bowl, use a clean electric mixer to whip 1 cup of heavy cream until stiff peaks form, which should take about 2-3 minutes. Be careful not to over-whip, as you want the cream to remain light and airy. Once whipped, gently fold the whipped cream into the marshmallow-cream cheese mixture using a spatula, taking care to maintain the fluffiness.
Step 5: Assemble Cheesecake
Once your filling is ready, pour it over the chilled graham cracker crust in the springform pan. Use a spatula to smooth the top evenly. Cover the pan with plastic wrap and refrigerate for a minimum of 4 hours, but preferably overnight, allowing the No-Bake Marshmallow Cheesecake to set fully and develop its flavors.
Step 6: Serve and Enjoy
When ready to serve, carefully remove the sides of the springform pan. Slice the cheesecake into wedges and serve chilled, enhancing each slice with your favorite toppings like whipped cream, fresh fruit, or chocolate drizzle for that extra touch. Enjoy the creamy delight of your No-Bake Marshmallow Cheesecake!

What to Serve with No-Bake Marshmallow Cheesecake
As you prepare to indulge in this creamy, dreamy delight, consider these complementary dishes to create the perfect meal experience.
-
Fresh Berry Salad: A vibrant mix of strawberries, blueberries, and raspberries adds a refreshing tartness that contrasts wonderfully with the sweet cheesecake.
-
Chocolate Drizzle: A simple drizzle of rich chocolate sauce enhances the creamy texture and adds a decadent touch, making each slice even more indulgent.
-
Whipped Cream Topping: Light and airy, a dollop of freshly whipped cream elevates the cheesecake experience, adding a delightful creaminess to each bite.
-
Minty Fruit Medley: Pair the cheesecake with a medley of fresh fruits like kiwi and mint for a clean, refreshing counterbalance to the rich flavors.
-
Iced Coffee or Latte: The smooth, rich flavors of a chilled coffee beverage complement the sweetness of the cheesecake, making this a delightful dessert pairing.
-
Chocolate Ice Cream: A scoop of chocolate ice cream beside the cheesecake adds a creamy contrast and further emphasizes the dessert’s indulgent nature.
-
Lemon Sorbet: The sharp citrus notes of lemon sorbet provide a refreshing palate cleanser, making it a fantastic accompaniment to this sweet treat.
-
Sparkling Water with Citrus: A fizzy, citrus-infused sparkling water can cleanse the palate beautifully between bites, making your dessert experience even more enjoyable.
-
Graham Cracker Crumbles: For added texture, sprinkle some graham cracker crumbles over the cheesecake slice, enhancing the crunch of the crust.
-
Fruit-Infused Iced Tea: An iced tea infused with fresh flavors like peach or berry enhances the overall meal and pairs well with the cheesecake’s creamy sweetness.
Expert Tips for No-Bake Marshmallow Cheesecake
-
Cool First: Ensure the marshmallow mixture cools before adding to cream cheese to prevent melting, ensuring a fluffy filling.
-
Chill Overnight: For a better texture and easier slicing, allow the cheesecake to chill overnight in the refrigerator.
-
Be Gentle: Fold whipped cream delicately into the filling mixture; this maintains the airy texture of your No-Bake Marshmallow Cheesecake.
-
Beat Softened Cream Cheese: Make sure your cream cheese is at room temperature before beating for a smooth, lump-free filling.
-
Store Properly: Cover well in the fridge if making ahead; it stays fresh for up to 2 days, and can be frozen for longer storage.
No-Bake Marshmallow Cheesecake Variations
Feel free to explore your creativity with these delightful twists on your No-Bake Marshmallow Cheesecake that will tantalize your taste buds!
-
Fruit-Infused: Add diced strawberries or blueberries into the cheesecake filling for a burst of fruity sweetness. Fresh fruit elevates the dessert and adds a lovely, colorful contrast to each slice.
-
Chocolate Delight: Swap out the graham cracker crust for an Oreo cookie base for a rich, chocolatey flavor. It’s an indulgent variation that chocolate lovers will adore!
-
Flavored Marshmallows: Experiment with flavored mini marshmallows, like strawberry or chocolate, to personalize the filling. This small change can add a whole new dimension of flavor to your cheesecake.
-
Nutty Crunch: Stir in chopped nuts, such as walnuts or pecans, into the filling for an unexpected crunch. Consider topping your cheesecake with caramel sauce for a sweet finish that’ll leave everyone asking for seconds.
-
Add Spice: A dash of cinnamon or nutmeg can be mixed into the filling for a hint of warmth and complexity. This simple addition beautifully complements the sweet and creamy notes, making it even more comforting.
-
Layered Treat: Create a layered dessert by alternating layers of the cheesecake filling with crumbled cookies or crushed candy. It not only looks stunning but also adds intriguing textures and flavors.
-
Tropical Twist: Incorporate coconut cream into your filling or top with shredded coconut for a tropical vibe. Pair it with fresh pineapple slices for a light, fresh experience reminiscent of summer vacations.
-
Dessert Parfaits: Turn your cheesecake into an easy parfait by layering the filling and crust in small cups. It’s a fun way to serve at parties or casual gatherings, just like our Italian Tiramisu.
With these tasty variations, your No-Bake Marshmallow Cheesecake can shine in countless delightful ways! Enjoy the process of making it your own, and don’t forget to share your creations with family and friends!
Storage Tips for No-Bake Marshmallow Cheesecake
Fridge: Store the cheesecake covered in the refrigerator for up to 2 days to maintain its freshness and creamy texture.
Freezer: For longer preservation, wrap the cheesecake tightly in plastic wrap and aluminum foil, and freeze for up to 1 month. Thaw overnight in the fridge before serving.
Airtight Container: If you have leftovers, ensure they are kept in an airtight container to avoid any absorption of odors from the fridge.
Reheating: This No-Bake Marshmallow Cheesecake is best served chilled; no reheating is necessary to enjoy its delightful texture and flavor.
Make Ahead Options
Making this No-Bake Marshmallow Cheesecake ahead of time is a fantastic way to save time and reduce stress at gatherings! You can prepare the crust and filling up to 2 days in advance, covering the assembled cheesecake with plastic wrap and refrigerating it. Additionally, if you make the filling a day early, it will allow the flavors to marry beautifully. To maintain quality, ensure it’s well-covered to prevent drying out, and let it chill overnight for the best texture. When you’re ready to serve, simply slice and add any desired toppings like whipped cream or fresh fruit right before indulging in this delightful treat!
No-Bake Marshmallow Cheesecake Recipe FAQs
How do I select the right marshmallows for the filling?
Absolutely! For the best results with your No-Bake Marshmallow Cheesecake, I recommend using mini marshmallows. They’re easy to melt and blend smoothly into the filling. If you can only find large marshmallows, feel free to chop them into smaller pieces before melting, ensuring a uniform consistency.
How long can I store the cheesecake in the fridge?
Your cheesecake will stay fresh in the refrigerator for up to 2 days. Just make sure it’s tightly covered to maintain its creamy texture and prevent it from absorbing any unwanted odors. It’s perfect for enjoying right away or making ahead for those busy days!
Can I freeze No-Bake Marshmallow Cheesecake?
Absolutely! To freeze your cheesecake, first wrap it tightly in plastic wrap, followed by aluminum foil to prevent freezer burn. It can be stored in the freezer for up to 1 month. When you’re ready to enjoy, simply thaw it overnight in the fridge for a delightful treat that tastes fresh!
What should I do if my cream cheese mixture becomes lumpy?
Very! If your cream cheese mixture is lumpy, it’s likely that the cream cheese wasn’t softened enough before whipping. To rescue your filling, let the mixture sit at room temperature for about 15 minutes, then beat it again until smooth. If needed, you can use an immersion blender for the last bit of blending to achieve that creamy, lump-free texture.
Are there any dietary considerations I should be aware of?
Yes! If you’re making this cheesecake for guests, keep in mind that it contains dairy ingredients like cream cheese and heavy cream, which may not be suitable for those with lactose intolerance or dairy allergies. As a fun alternative, consider experimenting with vegan cream cheese and coconut cream to create a dairy-free version without compromising on flavor.
What’s the best way to enhance the flavor of the cheesecake?
For an extra special twist, you can fold in some diced fruits like strawberries or blueberries into the filling, or top the cheesecake with chocolate sauce or crushed cookies before serving. This not only adds flavor but also makes for a visually stunning dessert that will wow your guests!

No-Bake Marshmallow Cheesecake: Creamy Bliss Without the Oven
Ingredients
Equipment
Method
- Begin by crushing about 1 ½ cups of graham crackers in a food processor until they resemble fine crumbs; this should take roughly 1-2 minutes.
- Melt ½ cup of unsalted butter in the microwave for about 30-40 seconds, then combine it with the crumbs in a mixing bowl.
- Press this mixture firmly into the bottom of a 9-inch springform pan and refrigerate for at least 30 minutes to set while you prepare the filling.
- In a small saucepan, combine 2 cups of mini marshmallows and ½ cup of whole milk over low heat, stirring gently for about 5-7 minutes until smooth.
- Remove from heat and allow it to cool to room temperature.
- In a large mixing bowl, beat 16 ounces of softened cream cheese until smooth and creamy, about 2-3 minutes.
- Gradually add in the cooled marshmallow mixture and 1 teaspoon of vanilla extract, mixing until fluffy.
- In a separate bowl, whip 1 cup of heavy cream until stiff peaks form, about 2-3 minutes.
- Gently fold the whipped cream into the marshmallow-cream cheese mixture.
- Pour the filling over the chilled crust and smooth the top. Cover and refrigerate for a minimum of 4 hours or preferably overnight.
- When ready to serve, carefully remove the sides of the springform pan, slice into wedges, and serve chilled with your favorite toppings.
Leave a Reply